Contents
Introduction
This guide is meant for people that just heard about NOAA satellites, that just saw somewhere that you can receive images from satellites quite easily and cheap. Read this to get started.
This is a guide about how to receive images, if you want information about how to use noaa-apt check the Usage page.
Check this tutorial too. It is meant for another decoder, WXtoImg, but it has useful information.
Important things to know
-
NOAA satellites are transmitting images 24/7, and the image you receive is a real-time image of your location. The transmission is free to be received by anyone with an antenna, and there is no official decoder or receiver.
-
NOAA images are black and white. When you see a color image it means it was colorized.
-
NOAA images do not have map lines (divisions between countries, states, or coastlines). When you see images with lines, it means that they used noaa-apt or WXtoImg to draw them according to a map and calculations about the position of the satellite when the image was taken.
-
The images are upside down 50% of the time, that’s because the satellites sometimes go from south to north and sometimes fron north to south. noaa-apt and WXtoImg can calculate the orbit of the satellite and rotate the image accordingly.
-
Images look much better on daylight, the satellites also send infrared images at night but I recommend receiving passes when the sun is high in the sky.
-
These satellites send images at realtime, line by line. Something like a 1000x1 resolution video or like a flying image scanner. These satellites fly on a polar orbit (north to south and south to north).
-
The satellite sends a FM signal, something like FM broadcast radio transmissions. Instead of music it sends images, but it works exactly the same. You can imagine that if your car stereo could tune to 137.1MHz you should hear the satellite transmissions without the need of a special antenna. That’s also why you can save the recordings as .wav files and decode those .wav files with this program, because it’s just a sound that encodes an image.
-
Image quality depends mostly on the signal quality. This is why it is recommended to do a antenna designed specially for these satellites.
-
If you want to know more visit How it works.
Guide
Maybe this image helps to understand how everything works, maybe not:

Things to buy
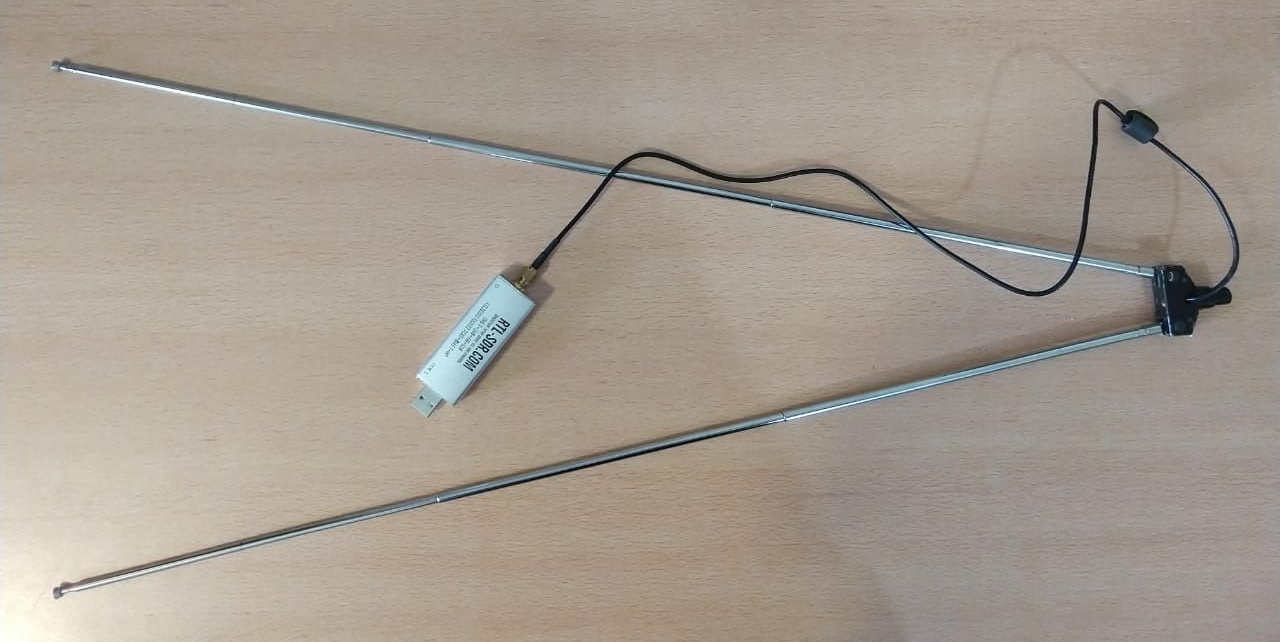
You need a RTL-SDR, it looks like a USB drive but it has a connector for antennas too. You can try first with a V-dipole antenna, RG-58 coax cable and adapters. Later you can improve reception if necessary building a Double Cross antenna or a QFH antenna.
If you want a kit with everything you need I recommend buying on RTL-SDR.com the “RTL-SDR Blog V3 dongle with dipole antenna kit”. If you can also buy the “SMA Straight Antenna Adapter Set”, useful if you plan on trying more antennas.
Keep in mind that there is no “official” RTL-SDR dongle, they were designed for receiving DVB-T TV, then people wrote custom drivers so it can receive anything else. There are lots of variations and all of them have similar performance.
Antenna
The most simple antenna you can use is a V-dipole antenna, consists of two wires or rods of 52cm, spread apart by 120 degrees. Instead of using a protactor you can use trigonometry, the distance between the tips of each rod should be around 90cm.
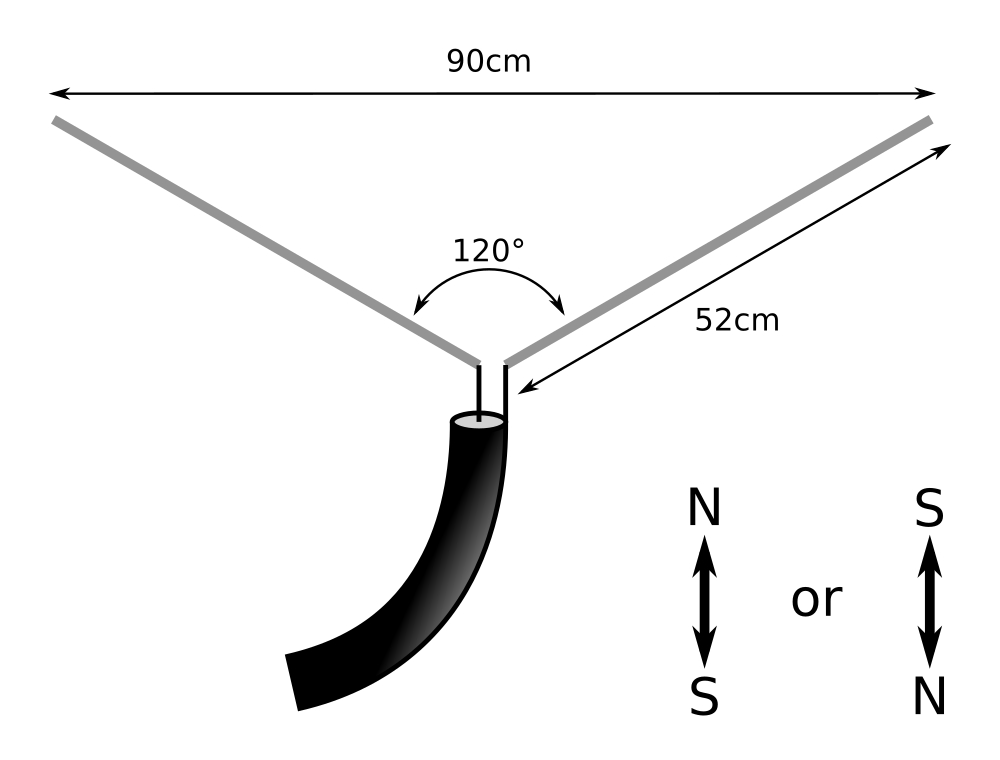
The antenna preferably should be placed horizontally and point to the north or to the south.
If you are going to build one yourself you need:
-
Some coaxial cable, there are lots of types, you can use RG-58 or something similar. Try using the shortest length you can, long cables lose more signal. Coax cables have two conductors, one inside and another outside called the shield.
-
At least some connector for the coax cable, there are lots of different connectors. You need SMA female or MCX male because SDRs can have a SMA male or MCX female port depending on the model. You can crimp the connectors yourself (you need a crimping tool) or you can buy coax cables with connectors on both sides (and cut one side to solder the antenna there). You can use type N connectors instead of using SMA/MCX ports and then use adapters or pigtails (pigtails are short cables used as adapters, they have different connectors on each side).
-
The rods can be made of any conductive material, hollow or solid, one of them should be soldered to the inner conductor and the other one to the shield of the coax cable. The diameter should be relatively small. Check this guide.
Set up
First you have to download some SDR software and some drivers, then connect the RTL-SDR dongle and the antenna and open GQRX/SDR#.
-
GNU/Linux: Download GQRX and the rtl-sdr drivers,
sudo apt install rtl-sdr
gqrx-sdr
should be enough. -
Windows: Download SDR# and install the drivers. Check the steps on the RTL-SDR.com guide or on the video below.
With SDR# or GQRX you can tune your SDR to any frequency and demodulate FM signals, try it with broadcast radio first (around 90MHz - 110MHz).
NOAA satellites can be received several times a day. To track the satellites you can use for example gpredict (GNU/Linux) or Heavens-Above (online or Android). You should look for passes with at least 20° of max elevation, but I recommend waiting for the passes during the day with at least 50° of max elevation.
Recording the WAV file
Set your SDR software for FM demodulation and tune it to the correct frequency depending on the satellite:
-
NOAA 15: 137.62MHz.
-
NOAA 18: 137.9125MHz.
-
NOAA 19: 137.1MHz.
When the satellite starts to rise above the horizon start recording a WAV file, you should hear the sound of the demodulated FM signal. When finished open the WAV file on noaa-apt to decode the image.
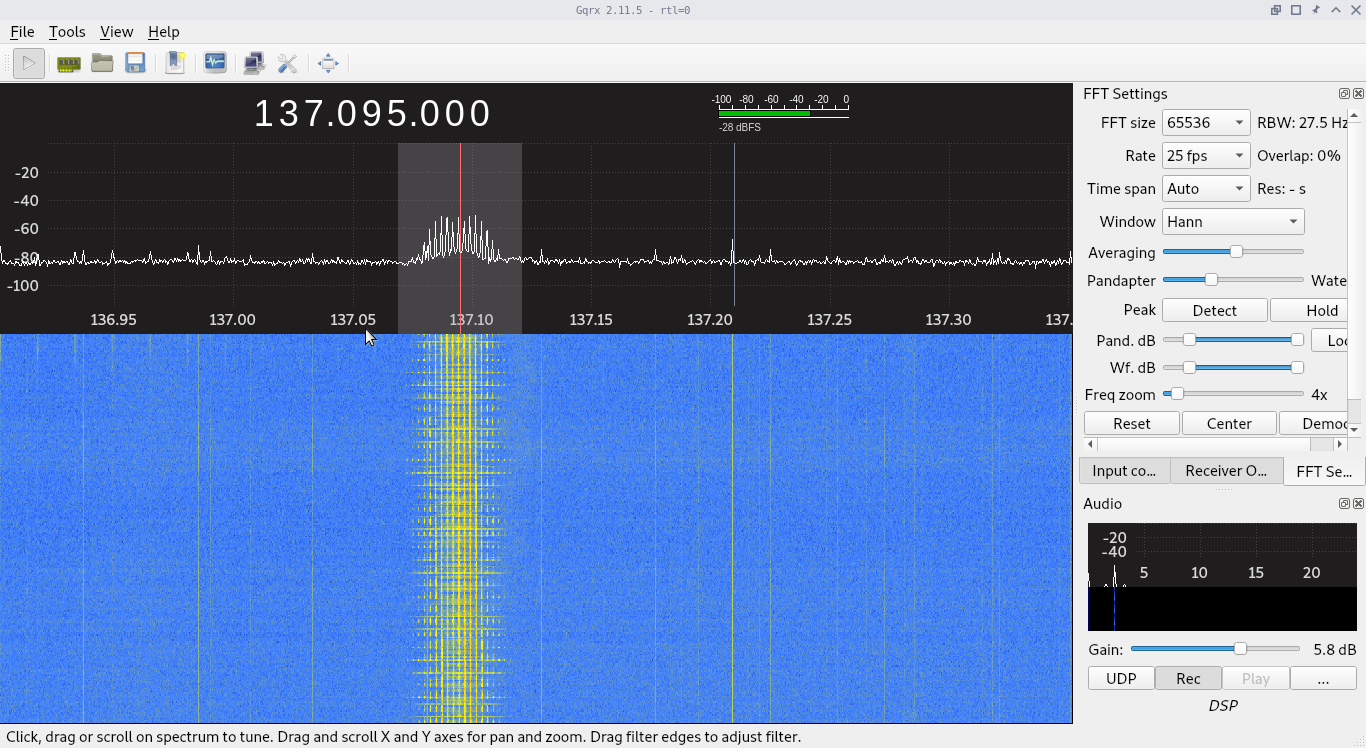
If using GNU/Linux, here you can see a screenshot of GQRX, things to note:
-
I have “Freq zoom” at 4x so I can see the signal better on the spectrum analyzer, these signals have a very narrow bandwidth.
-
The signal should fit inside the filter bandwidth (grey area).
-
I’m recording the WAV file (the “Rec” button on the bottom right is pressed).
Check this video for instructions on recording with SDR# on Windows, if using GQRX you can watch it too so you know what you should be seeing when the satellite is passing. Both programs are similar.
This is the list of Settings I use, both for GQRX and SDR#. Some of them do not make much difference.
-
Demodulation: WFM (Wide FM, mono).
-
Filter Width/Bandwidth: Custom, just wide enough so the signal fits as you can see on the spectrum analyzer.
-
Filter Shape: “Normal” on GQRX or “Blackman-Harris 4” with order 250 on SDR#.
-
AGC (Automatic Gain Control): off.
-
LNA gain: Max, but you can play with it and guess where it has the best signal to noise ratio (i.e. where it sounds better).
-
No “Noise Blanker” or “Noise Reduction”.
-
Squelch: Disabled (-150dB).
-
I don’t use any of “DC remove”, “Correct I/Q”, “I/Q Balance”, “Swap I/Q”, etc.
-
Input rate: Around 1,000,000 (1.00Msps).
-
Decimation: None.
Decoding the image
Download noaa-apt and load the WAV file. Check the usage page for details.
Going further
Once you receive your first images, you can try:
-
Decode your recordings using WXtoIMG instead. This program allows you to colorize your image.
-
Set up an automated receiving station with Auto137 or similar alternatives.
-
Try receiving images from Meteor M2 satellites which have a higher image quality.
Notes
-
Example of a WAV file, hear it, near the middle of the recording you can hear the ticking sound of APT signals.
-
You don’t need a LNA or a high antenna. I’m using a Double Cross Antenna, roughly 2m above the ground and 3-4m of RG-58 coax. Probably helps being far from big cities. The video above was recorded using the antenna from the RTL-SDR.com kit instead.
-
It is not necessary to compensate doppler shift.
Decoding WAV on WXtoImg
If you want to decode your WAV file on WXtoIMG:
-
Resample the recording to 11025Hz, you can use noaa-apt for that.
-
Enable Expert mode, on Options > GUI Options.
-
Restart WXtoIMG.
-
File > Load audio file.
-
Select Satellite > NOAA.
-
Select Options > Disable map overlay because it could be wrong if you have a wrong timestamp on your file.
-
File > Decode.
If you want map overlay:
-
The modification timestamp of the new file should be the moment of the end of the pass. If you resampled the file using noaa-apt it should be OK, otherwise change it if necessary using the noaa-apt GUI or using your terminal.
-
Uncheck Options > Disable map overlay.
-
Set Options > Ground Station Location.
-
Use Enhacements > Normal or any enhacement different than Pristine (because it means no enhacements).
Optional:
-
Options > Resync.
-
Options > Disable PLL.
-
Options > Illumination Compensation.