Contents
Running
It depends on your system and how you installed the program:
GUI
The GUI version can open a graphical window, this is the easiest way to run the program.
-
On Windows, double click the executable.
-
On GNU/Linux, if you installed the
.debfile, open a terminal and run:noaa-apt -
On GNU/Linux, if you extracted the
.zipfile, double clickrun-noaa-apt.sh.
Terminal
Both the GUI and no-GUI versions can be used from the terminal. If you run the program without arguments the GUI will open, so make sure to at least give the input filename as an option.
-
On Windows, use the
noaa-apt-console.exeexecutable to be able to see console output. E.g:noaa-apt-console.exe input.wav -o output.png -
On GNU/Linux, if you installed the
.debfile, open a terminal and run:noaa-apt input.wav -o output.png -
On GNU/Linux, if you extracted the
.zipfile,cdto the directory and run it. E.g:cd ~/Desktop/noaa-apt/ ./noaa-apt input.wav -o output.pngWhen doing automation like in a cronjob:
cd ~/Desktop/noaa-apt/ && ./noaa-apt input.wav -o output.png
See below for more command-line options.
Program usage
Takes a recorded WAV file (from GQRX, SDR#, etc.) and decodes the raw image. Works with WAV files of any sample rate, 32 bit float or 16 bit integer encoded. When loading audio files with more than one channel (stereo), only the first one is used.
This program needs to know the position of the satellite when the recording was made for some features (especially the map overlay). So by default it will try to guess the satellite name and recording time from the filename, and then it will download an updated TLE file with orbit information from the internet.
If the filename has a custom name, this can fail. So you will have to check the recording time and choose a satellite. Below there are instructions on how to edit the configuration file and “teach” noaa-apt how read your filenames.
IQ files are not supported, these files should be FM demodulated into WAVs first. SDR# and GQRX can load and demodulate IQ files with a specific format, more information here.
GUI
The program has three steps: Decoding, Processing and Saving:
-
First, load a WAV file and press the Decode button. You will see the progress on a bar below.
-
Then, move to the Processing tab. Try pressing the Process button right away to see the image. Now you can play with the settings and press the Process button as many times as you like until you are happy with the result. See below for a better explanation of the settings available here.
-
Finally, go to the Save tab to write the image to a file.
There are also two optional tools:
-
On Tools > Resample WAV you can resample a WAV into another WAV, this is useful if you want to try a program like WXtoIMG or atp-dec/apt-dec that requires a specific sample rate. If resampling, the modification timestamp should be preserved correctly.
-
On Tools > Timestamp WAV you can change the modification date and time present on the metadata of a file. Useful when you want to decode a WAV file on WXtoIMG and you need to change the timestamp to fix the map overlay. You can load a timestamp from another file in the case you want to copy the timestamp from one file to another. Otherwise just select time, date and write the timestamp to your WAV recording.
Terminal
Usage:
  target/debug/noaa-apt [OPTIONS] [INPUT_FILENAME]

Decode NOAA APT images from WAV files. Run without arguments to launch the GUI

Positional arguments:
  input_filename        Input WAV file.

Optional arguments:
  -h,--help             Show this help message and exit
  -o,--output FILENAME  Set output path. When decoding images the default is
                        './output.png', when resampling the default is
                        './output.wav'.
  -v,--version          Show version and quit.
  -d,--debug            Print debugging messages.
  -q,--quiet            Don't print info messages.
  -r,--resample SAMPLE_RATE
                        Resample WAV file to a given sample rate, no APT image
                        will be decoded.
  --no-sync             Disable syncing, useful when the sync frames are noisy
                        and the syncing attempts do more harm than good.
  -c,--contrast METHOD  Contrast adjustment method for decode. Possible values:
                        "98_percent" (default), "telemetry", "histogram" or
                        "disable".
  -s,--sat SATELLITE    Indicate satellite name. Possible values "noaa_15",
                        "noaa_18" or "noaa_19". If no --sat is provided, it
                        will be guessed from the filename, otherwise it will be
                        NOAA 19
  -m,--map MAP_MODE     Enable map overlay. Possible values: "yes" or "no".
  --map-yaw YAW         Yaw correction for map overlay in degrees. Default: 0.
  --map-hscale HSCALE   Horizontal map scale correction for map overlay.
                        Default: 1.
  --map-vscale VSCALE   Vertical map scale correction for map overlay. Default:
                        1.
  -R,--rotate METHOD    Rotate image, useful for South to North passes where
                        the raw image is received upside-down. Possible values:
                        "auto", "yes", "no" (default). If using "auto", the
                        program uses orbit calculations and reception time to
                        determine if the pass was South to North.
  -F,--false-color      Attempt to produce a colored image. Use with
                        "--contrast 98_percent" or "--contrast telemetry". Also
                        see the option "--palette".
  -P,--palette PALETTE  Palette to use when generating false color image.
                        Should be a PNG with a size of 256x256 pixels. It will
                        map channel brightness to a pixel color, X axis
                        represents channel A brightness and Y axis is channel B
                        brigtness. Built-in palettes are available in the
                        folder "res/palettes/".
  -t,--start-time START_TIME
                        Provide recording start time, used for orbit
                        calculations. Use RFC 3339 format which includes date,
                        time and timezone, e.g. "1996-12-19T16:39:57-08:00". If
                        this option is not provided, it will be inferred from
                        the filename or from the file modification timestamp.
  -T,--tle TLE          Load TLE from given path. Very useful when decoding old
                        images and if you have a TLE from around that date. If
                        no --tle is provided and the current cached TLE is
                        older than a week, a new weather.txt TLE from
                        celestrak.com will be downloaded and cached.
  -p,--profile PROFILE  Profile to use, values loaded from settings file.
                        Possible values: "standard", "fast" or "slow".
  --wav-steps           Export a WAV for every step of the decoding process for
                        debugging, the files will be located on the current
                        folder, named {number}_{description}.wav
  --export-resample-filtered
                        Export a WAV for the expanded and filtered signal on
                        the resampling step. Very expensive operation, can take
                        several GiB of both RAM and disk. --wav-steps should be
                        set.
  --rotate-image        Deprecated. Use --rotate instead
If resampling, the modification timestamp should be preserved correctly.
The timestamp modification tool is only available via the GUI, if you need to set arbitrary timestamps to files using the terminal use your OS commands. On GNU/Linux:
-
Generally you just have to copy the timestamp from one file to another one using:
touch -r reference_file.wav recording.wav. -
Set any timestamp you want with
touch -d "2019-01-31 18:31:20.579283000" recording.wav.
Processing
Contrast adjustment
You can choose between four contrast adjustment methods:
-
MinMax: It doesn’t do anything, just maps the darkest pixel to black and the brightest pixel to white.
-
98 percent: I don’t know how to name it, ignores the darkest 1% of pixels and the brightest 1% of pixels. Something like a percentile, this is the default method.
-
From telemetry: Checks the wedges from telemetry bands, those wedges have shades of grey that go from black to white. This method is better than “98 percent” but can fail on noisy images.
-
Histogram equalization: Applies this (non-linear) adjustment over both channels independently. It is the method that produces the best looking images, but it can look bad if there is a day/night channel switch.
Rotate image
These satellites have polar orbits, so sometimes you see them go from north to south and sometimes from south to north. The program will try to guess the correct orientation from the satellite position at the recording time, be sure to select the correct satellite. If this fails, you can manually set to rotate the image or not.
False color
The image is colorized according to the brightness of the pixels in the image. Generally this does not produce very good results because water can be confused with land, clouds can be confused with vegetation, etc.
When using the GUI, some sliders will be available to tune the values used when computing the false colors. And this can help to get better results in problematic images.
There are several color palettes available:
-
noaa-apt-daylight.png: Will try to do a guess of colorizing water, land and ground. When the program is not sure of which color to use, it will use some color in-between, trying to make the result pleasant to the eye. Designed for images transmitted at daylight (channels 2 and 4) -
noaa-apt-daylight-thresholds.png: The same as before but in this case it will always colorize with a very well defined color, but it will be very evident when the program confuses water with ground. -
aptdec-HRPT-falsecolor.png: It was taken from aptdec, and is also designed for daylight images. A more technical explanation is available here. -
noaa-apt-night.png: It is designed to be used when the satellite sends infrared images at night (channels 3A and 4). It will colorize the image in a way that highlights differences between channels, trying to make very visible everything captured in the image. The colors have no physical meaning, I chose them to make the image beautiful. -
Also there are several palettes taken from WXtoImg. Honestly I don’t like and I don’t understand them. Some seem to be also designed to just put nice colors without a precise meaning.
Satellite prediction
The program needs to calculate the satellite position at the recording time to draw accurate map overlays. The following information is used:
-
Satellite name: NOAA 15, 18 or 19. This program will try to guess it automatically, take a look at the filename guessing section.
-
Recording time: You can provide the recording start or end time. This program will try to guess it automatically, take a look at the recording time guessing section.
-
TLE or Keplerian elements: This is a file with information about the orbit of satellites. Orbit information for NOAA satellites is usually taken from a TLE file named
weather.txt, and it is important to use a TLE file with a date close (a few months) to the recording time to get accurate predictions. This program automatically downloads a new TLE file from celestrak.com once a week, so if the WAV recording is recent you don’t wave to do anything. But if you are working with a reception from years ago, be sure to use an historicweather.txtfile as a custom TLE.
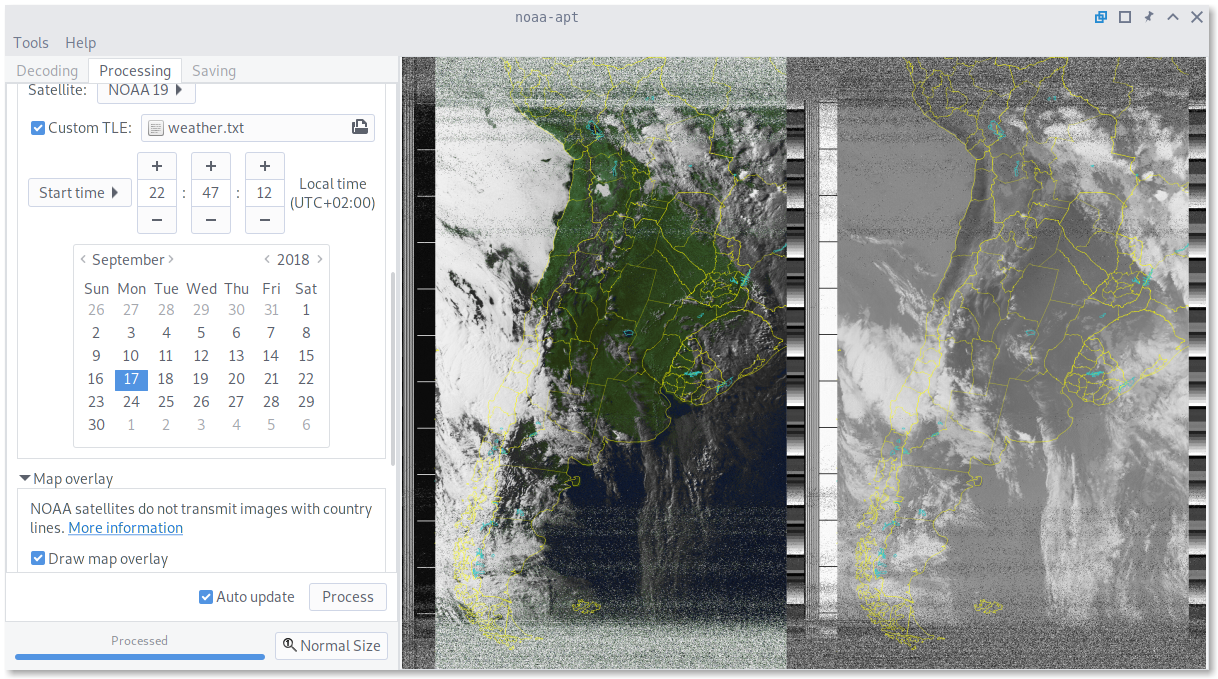
Map overlay
Limits of countries/states/provinces/lakes can be drawn over the image according to the satellite position prediction. Line colors can be set from the GUI or from the configuration file. You can disable some lines by setting the color to completely transparent.
Currently I’m unable to make it completely accurate (see the relevant issue on the GitHub repository), so you will have to play around with some settings:
-
Make sure to select the correct satellite (NOAA 15, 18 or 19).
-
Change the recording time and date slightly to move the map overlay up and down.
-
Change the Yaw correction setting to rotate the map a bit.
-
Change the horizontal and vertical scale if necessary.
Advanced settings
Disable syncing
The program aligns the image to sync frames (the black and white stripes), disabling can help with some noisy images, but the resulting image has some slant. See also Troubleshooting.
Configuration file
The first time you open noaa-apt, a default configuration file will be created depending on your operating system:
- Linux:
~/.config/noaa-apt/settings.toml - Windows:
C:\Users\[USER]\AppData\Roaming\noaa-apt\settings.toml - MacOS:
~/Library/Preferences/ar.com.mbernardi.noaa-apt/settings.toml
There you can change some advanced settings, be sure to check it if you plan to use noaa-apt for automatic image reception. Here you can see the default configuration file.
Keep in mind that newer versions of the program will need newer versions of
this file. When executing a new version of noaa-apt your settings file will be
moved to settings.OLD and a updated settings.toml will be created. You will
need to move your changes to the new file afterwards.
Profile
The profile can be set using a commandline option, or you can change the default profile by editing the configuration file. Different profiles use different filters and sample rates, as a compromise between image quality and decoding speed. On Raspberry Pi I recommend using the “fast” profile. If you are having noisy images you can try the “slow” profile once just in case, but the default “standard” profile should always work fine.
Filename guessing
For the map overlay to work, the program needs to know the exact time the recording was done and the recorded satellite. Three methods are tried in order:
-
Priority is given to the date, time and satellite provided manually by the user, it can be done from the GUI or from the command-line.
-
If no information was given, the program looks at the WAV filename if it has a known format (e.g.
gqrx_20201231_235959_...wav) to determine the necessary details. The program supports some common filename formats, you can add more in the configuration file if necessary. -
Otherwise, the file modification timestamp will be used. This is not very precise and it tends to change unexpectedly when editing the WAV file.
It is important to provide an exact recording time, if there is a difference of at least a few seconds, the map overlay will be placed at the wrong place.
Something similar happens with the satellite name. If the filename format is known (i.e. it is defined in the configuration file), the program will automatically detect if NOAA 15, NOAA 18 or NOAA 19 was recorded. This is possible because some filenames indicate the satellite number or the recording frequency.
Export WAV steps
If enabled, the program will save lots of WAV files, one for each step done on the decoding process. I open those files on Audacity for debugging, check if the filters are working, etc. The directory where the files are saved is the working directory of the program, generally your home folder.
Exporting the “resample filtered” is a very expensive operation, can take several GiB of both RAM and disk, so this step is not exported by default and has to be enabled separately.
Troubleshooting
Problems with noaa-apt
If the program crashes or you want more information, run noaa-apt with console output, see above. Anyways, please contact me so I can fix it.
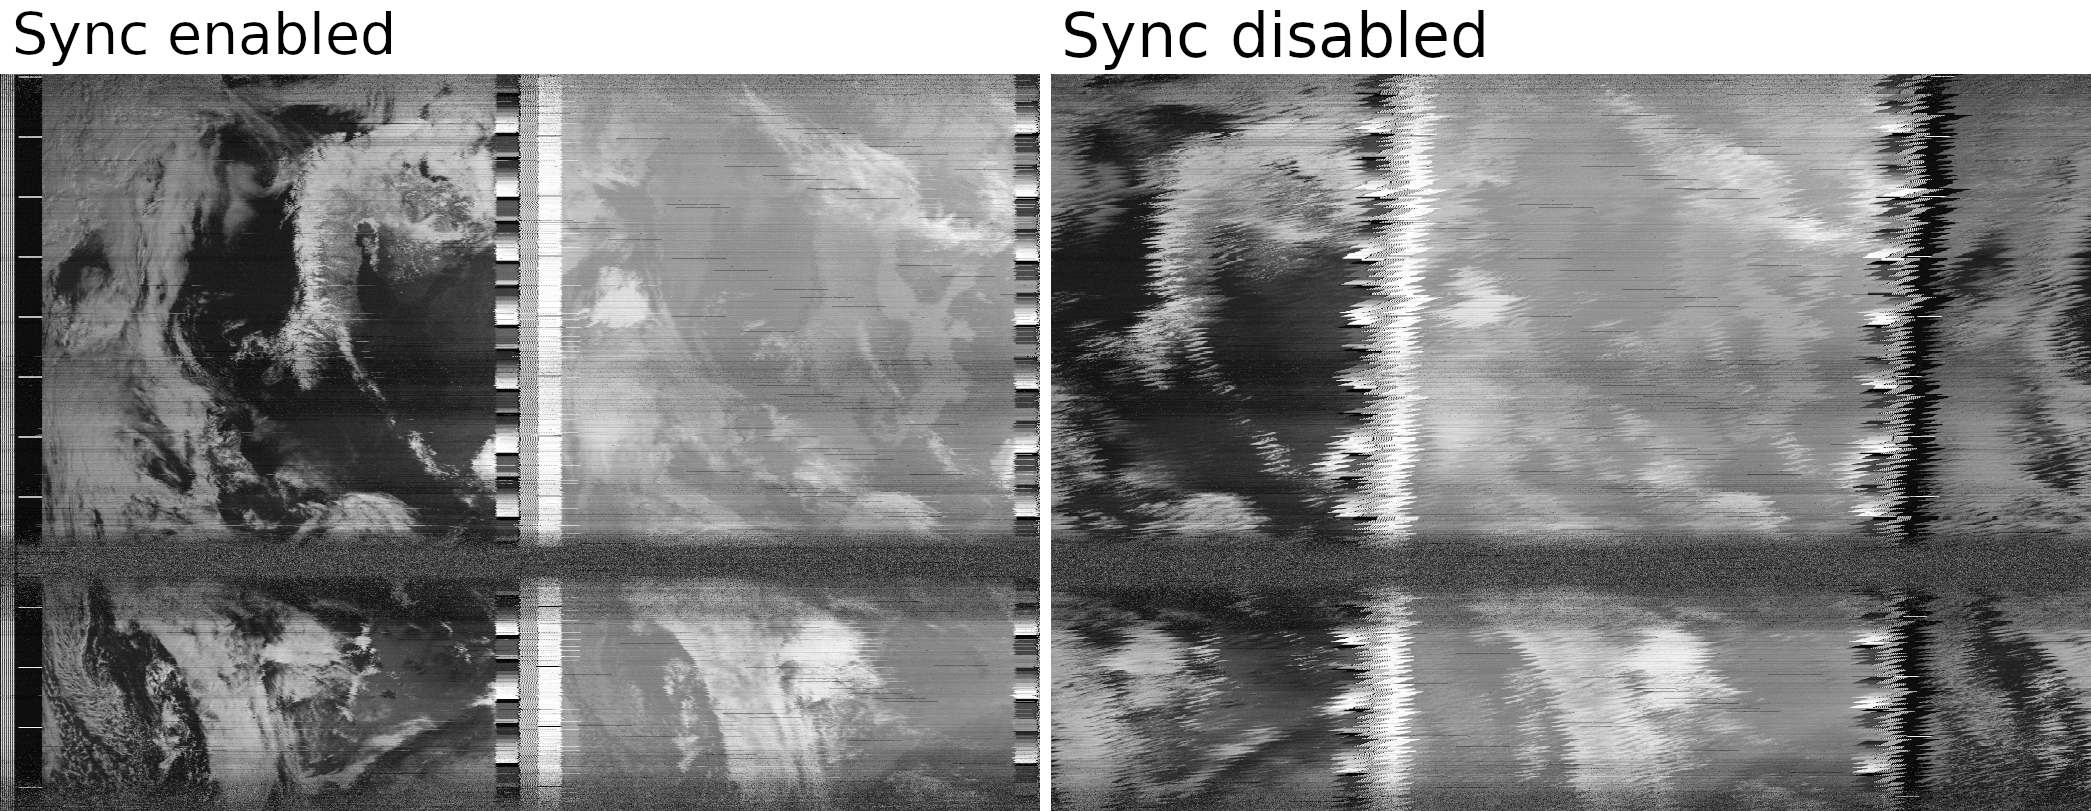
Bad contrast, dark images
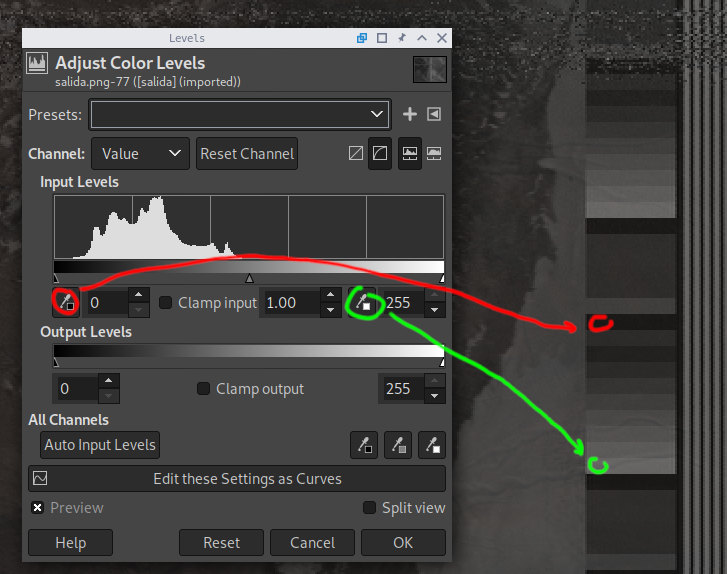
The program tries to adjust the contrast with a conservative method, you can try another one, check the advanced settings.
If the image needs more contrast you can adjust it with an image editor. I use GIMP and the tool Colors > Levels. You can pick a white spot and a black spot as you can see on this screenshot or you can move the Input Levels sliders manually.
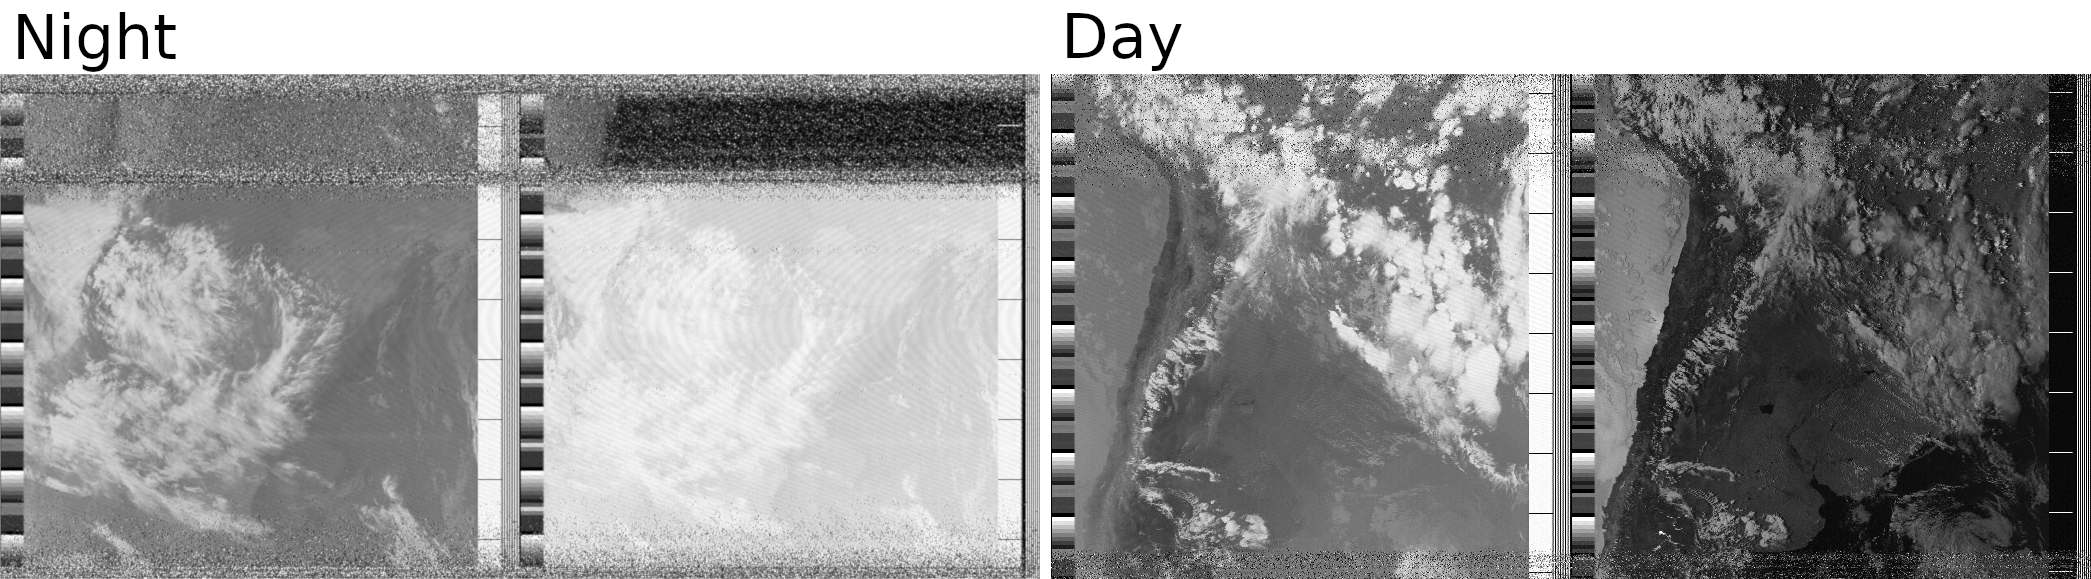
Also, images taken during the night (taken using a infrared sensor) or close to sunrise/sunset have very little contrast, I recommend to take images during the day with the sun high above the horizon.
Check these images for a comparison. On the left image ignore the noise (caused by a bad antenna) and note how the right channel changed the active sensor from visible to infrared and went from a dark to a bright image.
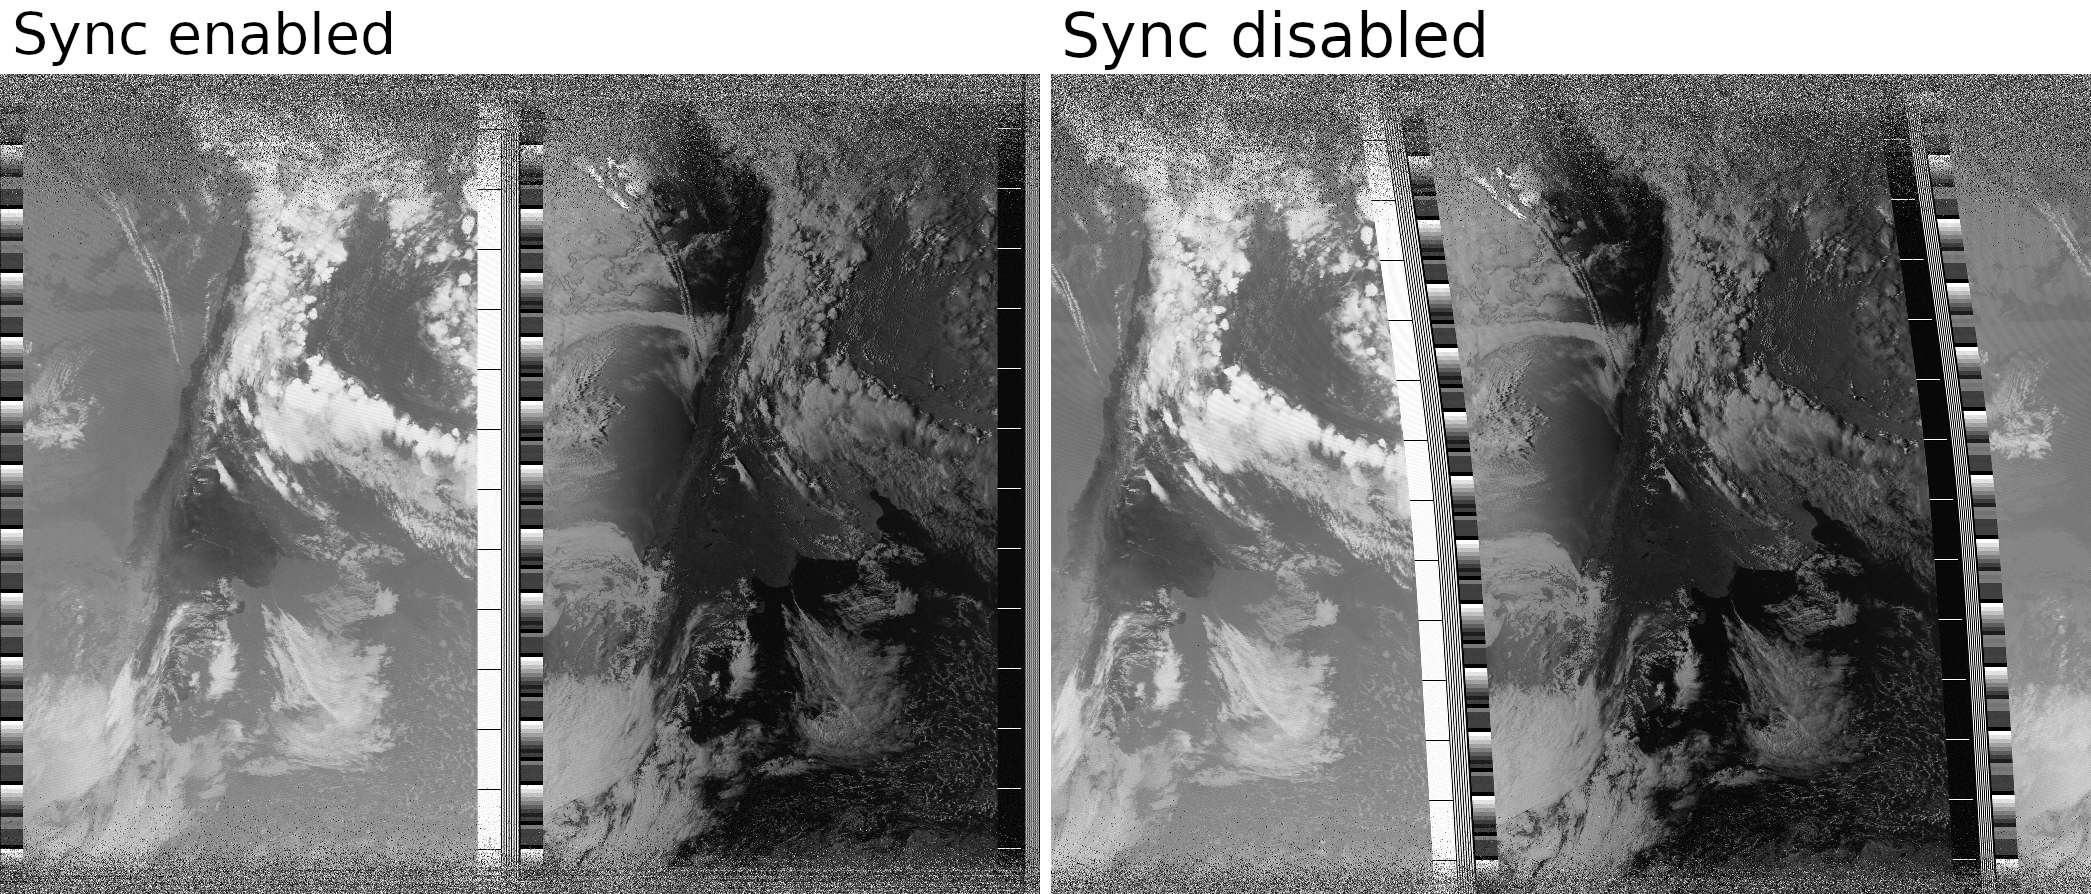
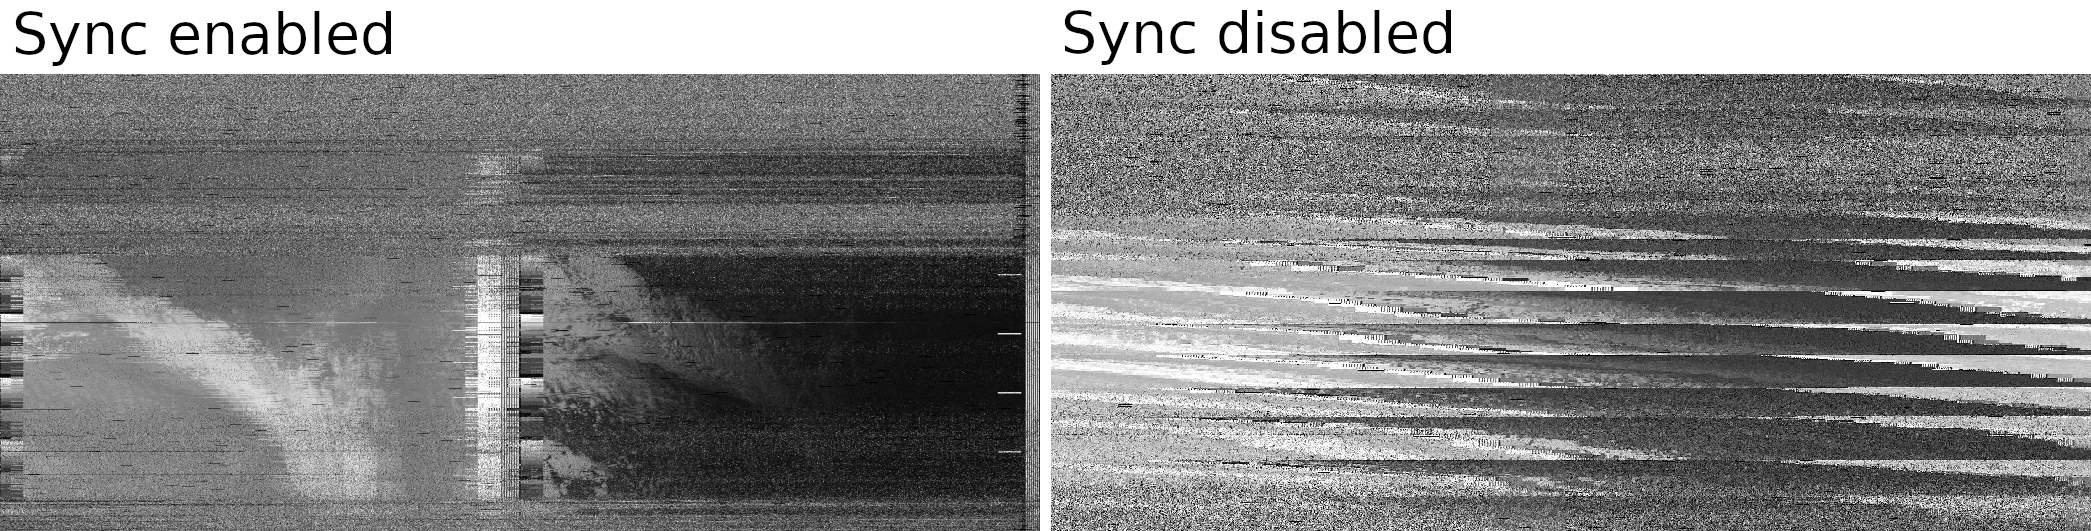
Syncing problems
This program starts a new line when it sees a sync frame (those seven white and black stripes), works well if the signal has clear sync frames but can produce horizontal lines on some images.
You can disable the syncing (on GUI there is a checkbox, for commandline the
option is --no-sync). The image should have a
smooth slant and you can manually edit and
straighten the image using GIMP. If without syncing the image looks worse, you
have missing samples, see below.
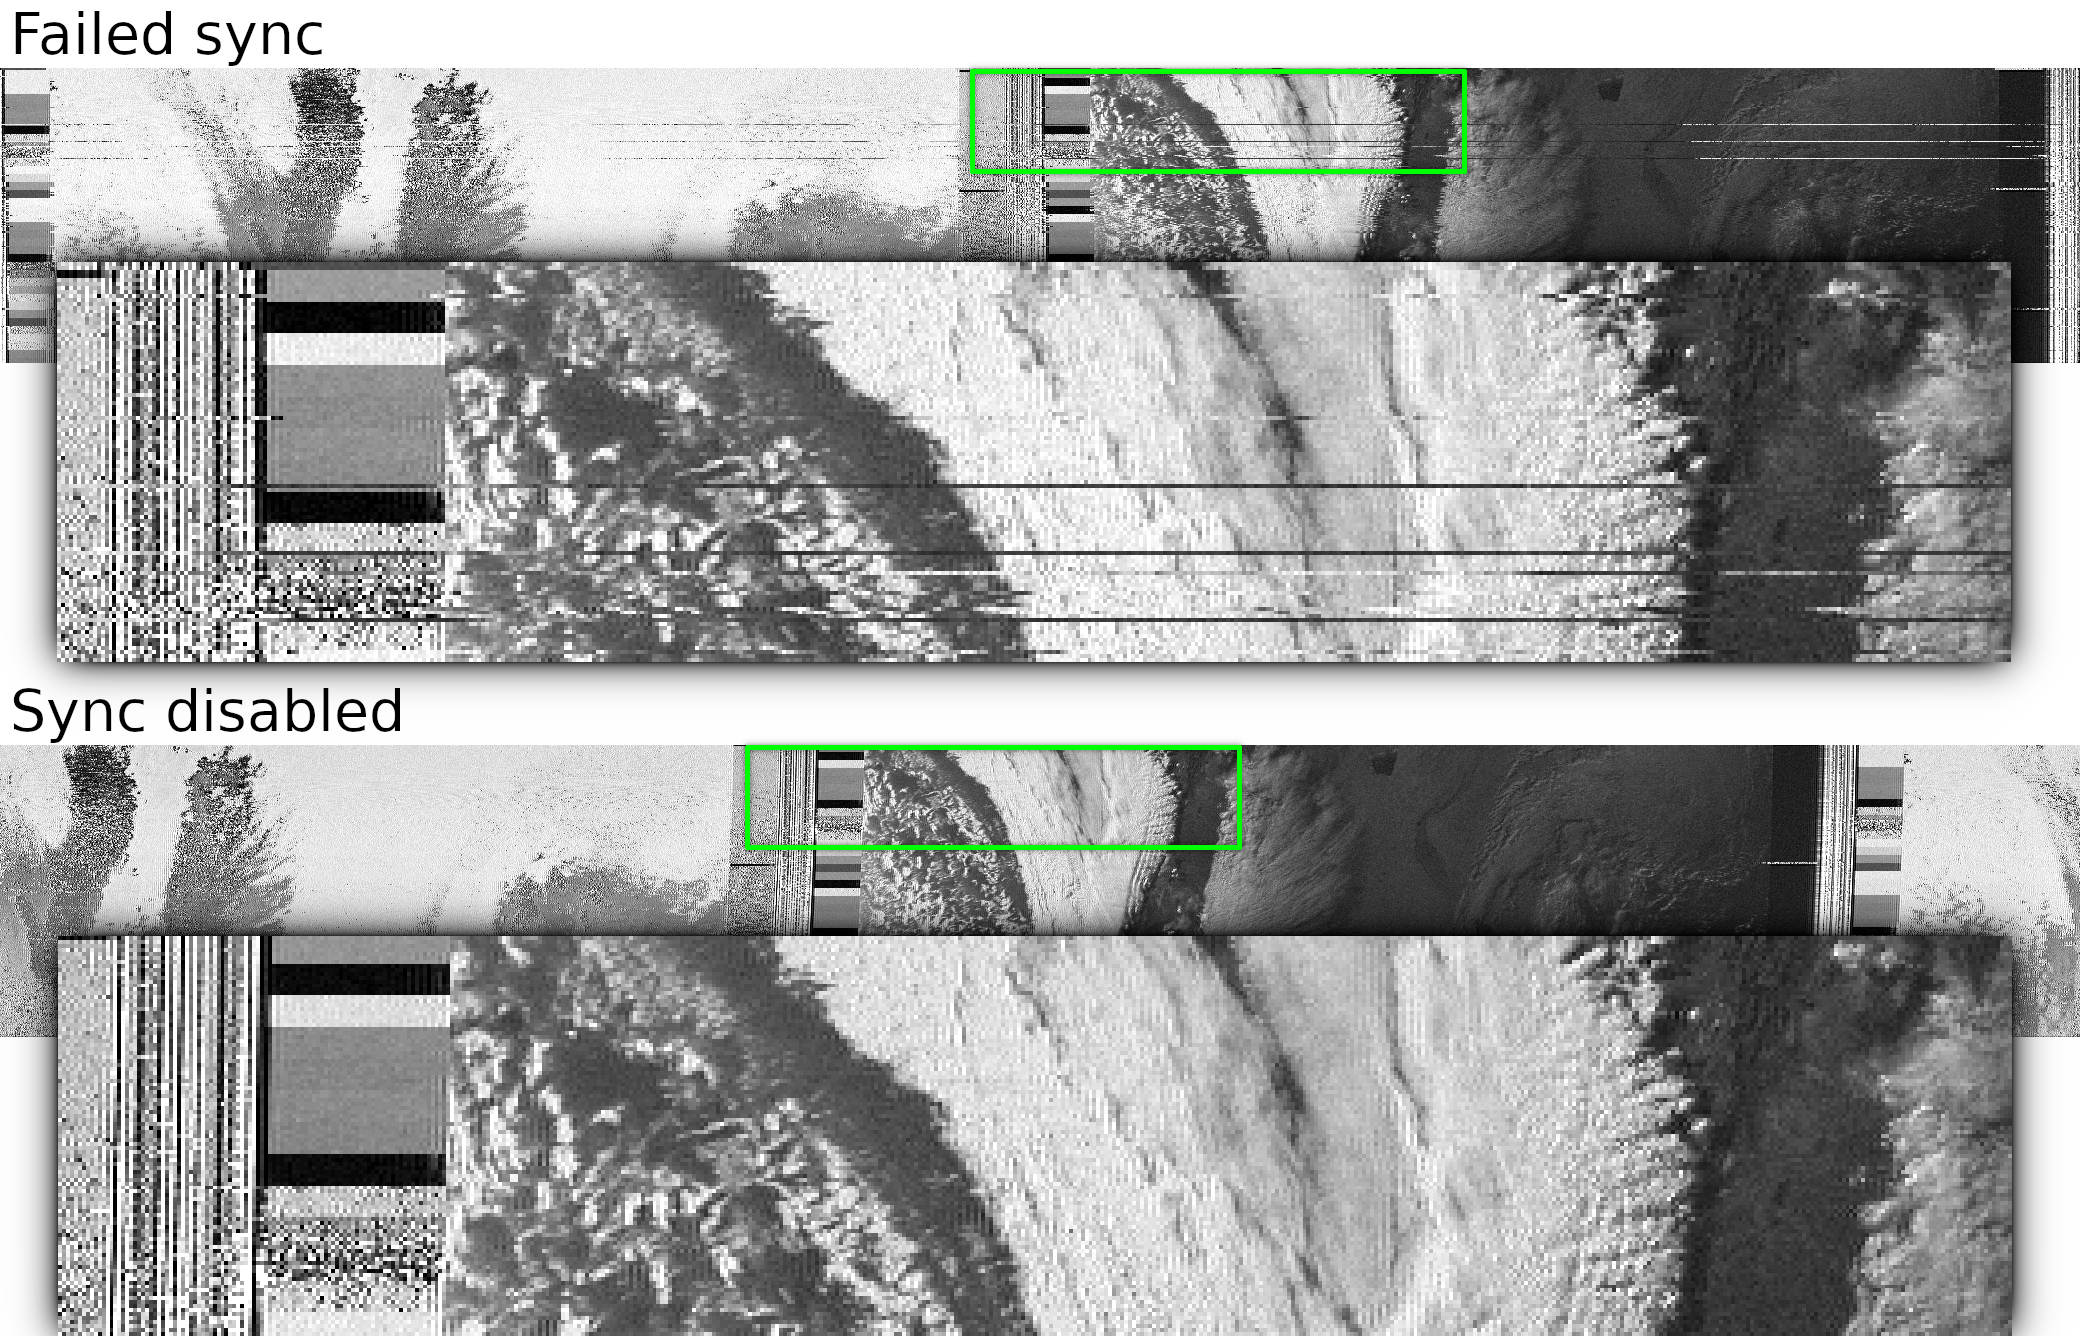
Missing samples
Sometimes the computer has hiccups and skips samples when receiving and creating the WAV file (this is not caused by noaa-apt), this can cause short horizontal black lines or syncing problems (producing long horizontal lines).
This problem is more evident when using WXtoIMG or when disabling syncing, because you can see the image somewhere but it has lots of cuts and strange things, see the examples below.
You can try:
- Receiving on another computer.
- Using a smaller RF sample rate 1,000,000 (1Msps) should be fine.
- Closing unused programs.
- Giving more priority to the SDR receiver process.
- Increasing the audio buffer, I am aware that at least SDR-Console has this setting. On SDR# I think that increasing the Latency setting on the Audio panel should give the same result.
If you think that your receiver might be skipping samples, try disabling syncing, you should see a mess instead of a smooth slant, thank you Gagootron, xxretartistxx and unknownantipatriot for these images:

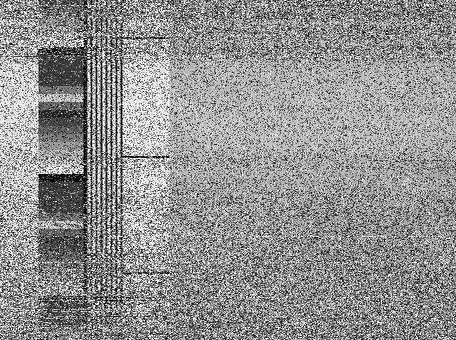
Noise
Sometimes the reception is bad and you should try receiving another pass, maybe with a better antenna.
Something strange
You can set the option to export a WAV file with the samples used in each step of the decoding process, then open each WAV on something like Audacity to see where things went wrong. I use Audacity because it shows the samples clearly and Analyze > Plot Spectrum is really useful.
Otherwise you can send me the WAV file so I can take a look, it could be a problem with my decoder.